Tee Sheet Setup in StarterHut
Before you begin, confirm your enterprise information is set up by opening the StarterHut module and selecting Admin. In the menu at the left, select Admin > Enterprise Information. The screen will display your facility's profile information. Typically, enterprise information will have already been set up for you. If not, the options for setting your Enterprise Information are located under Tools > Options > Global Options > Enterprise.
Two other areas to check are Site Information and Course Information. Some facilities will only have one site and one course, while some multi-course operators will have several sites with several courses to manage. View this information in StarterHut by selecting Admin and from the left menu select Admin > Site Information or Admin > Course Information. It is a good idea to review these areas before setting up a tee sheet.
How To Create a Tee Sheet Template
Step by step:
- Open the StarterHut module. Select the Admin button.
- From the menu at the left, go to Setup > Tee Sheet Template Setup.
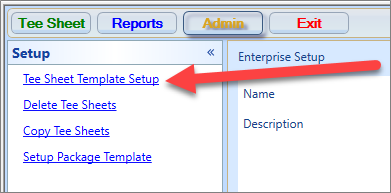
The screen will display a list of tee sheet templates.
It is common to have three types of templates: Regular, Crossover, and Shotgun. - Click the template you wish to use (e.g., Regular), and then select the Edit button.
The template will provide a standard setup for you to customize to your liking. Alternatively, you may select the New button to skip the template and set up all new information.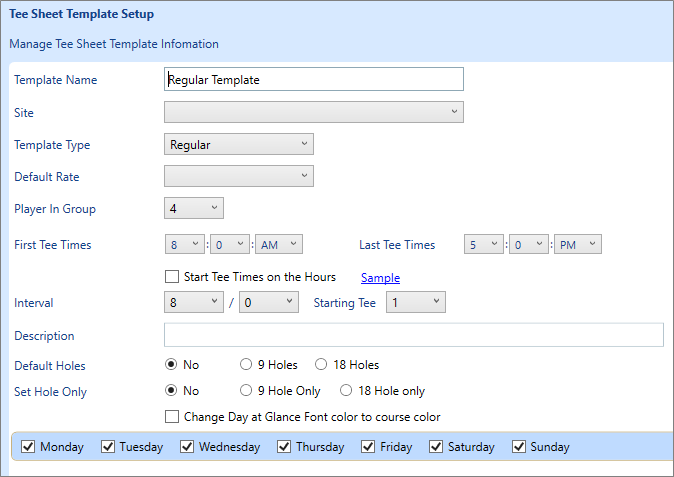
From the Manage Tee Sheet Template Information screen, you can set the available options. - Define the options of your tee sheet:
a. Template Name: Enter a name to describe this template, such as Basic Weekend Schedule.
b. Site: Select your facility where this template will be used.
c. Template type: Select the template you are using, e.g. Regular, Shotgun, or Crossover.
d. Default rate: Select a rate or leave this field blank. This field is helpful when multiple rates are used.
e. Player in Group: This sets the maximum number of players allowed for a tee time.
f. First tee time: This sets the start time for the course.
g. Interval: This option sets how much time is allowed between tee times.
The default value is 8 minutes, which is a common value to use. The value usually falls between 7 to 9 minutes. The second Interval field allows a course to set up alternating intervals, such as an 8-minute interval followed by a 7-minute interval (15 minutes for every two intervals), in order to keep tee times landing on the hour throughout the day. You may leave the second Interval field at 0 if you do not wish to alternate intervals.
h. Default holes: Generally set to No, but there are options to set to 9-holes and 18-holes.
i. Set Holes: Set to No, but there are options to set to 9-hole Only and 18-hole Only.
j. Days: This options allows you to create tee time templates for different days of the week, such as a weekday template and a weekend template, for example. - Select the OK button.
Your template will be saved.
Repeat this process to create a new tee sheet for a different course or a different day of the week.
Next, you will apply the template to your tee sheet.
How To Apply a Template to a Tee Sheet
Step by step:
- From the StarterHut module, select Tee Sheet at the top left.
The tee sheet screen will display. For a new course setup, a list of available tee sheet templates will display on the screen. Note: For courses that have been partially set up, a calendar screen will display from which you will modify templates. These steps will describe how to set up a new course with new tee sheets.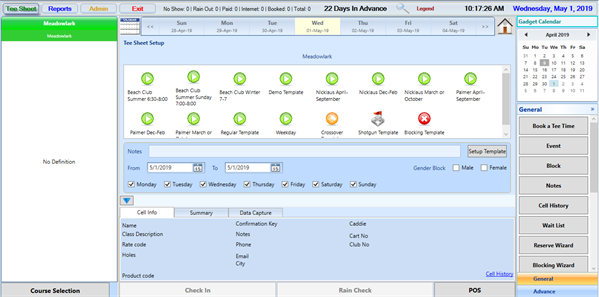
- Confirm the course name of the correct course is listed at the top left. (The course name is Meadowlark, in this example.) Use the Course Selection button to choose a different course, if needed.
- Decide whether you wish to apply the template for a date range or for an individual day.
- Select the date when you wish to begin applying the template (May 1, in this example). Then select the date or date range to which you want to apply the template using the From and To fields. You have the option to choose which days of the week to apply the template within that date range, such as only weekdays. Enter a note in the Notes field, if you wish.
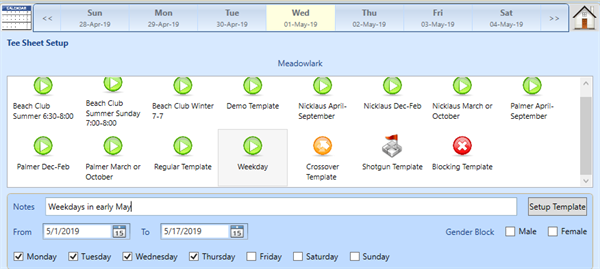
- Double-click the template icon.
The template will now be applied to the days within the date or date range you selected.
Repeat the above steps to apply templates across different dates and date ranges.
Note: One method is to apply tee sheet templates in date ranges of small increments at a time such as a month. This works well if you are busy attending to tasks on your computer. If you choose to set up an entire season or multiple years, expect the software to require some time to process everything (15-20 minutes).
To start using the tee sheet, you will need to ensure the rates are set up. Rates include the green fees, cart fees and other miscellaneous charges affiliated with tee time reservations. Rates are set up in the Inventory module. To learn more on rate setup, click here>>
Related Topics
-
Using the Wait List Feature in Starter Hut v3: For a video, click here>>
-
To learn how to use the Wait List Feature in CPS Air, click here>>
-
For a video, click here>>
-
Using the Quick Shotgun feature in Starter Hut v3: For a video, click here>>